Sunday, November 30, 2014

Step by step execution ... and reverse steps

A few years ago, Greg Wilson mentioned that, a useful feature when teaching students would be the ability of recording programs and have the possibility of playing them back one step at a time either in the forward or backward direction.   Actually, I am paraphrasing what Greg said or wrote, as I don't exactly remember the context: it could have been in a web post, a tweet, or the one time we met and when I gave him a brief demo of what Crunchy was capable of doing at the time.   While I can not say for sure what Greg said/wrote and when he did it, the idea stuck in my head as something that I should implement at some point in the future.

This idea is something that the Online Python Tutor, by Philip Guo, makes possible.

It is now possible to do this with Reeborg's World as well. :-)


Thursday, November 27, 2014

Practical Python and OpenCV: conclusion of the review

I own a lot of programming books and ebooks; with the exception of the Python Cookbook (1st and 2nd editions) and Code Complete, I don't think that I've come close to reading an entire book from cover to cover.  I write programs for fun, not for a living, and I almost never write reviews on my blog.  So why did I write one this time?

A while ago, I entered my email address to receive 10 emails meant as a crash course on OpenCV, using Python (of course), provided by Adrian Rosebrock.  The content of the emails and various posts they linked intrigued me. So, I decided to fork out some money and get the premium bundle which included an introductory book (reviewed in part 1), a Case Studies (partly reviewed in part 3), both of which include code samples and (as part of that package) free updates to future versions.  Included in the bundle was also a Ubuntu VirtualBox (reviewed in part 2) and a commitment by the author to respond quickly to emails - commitment that I have severely tested with no complaints.

As I mentioned, I program for fun, and I had fun going through the material covered in Practical Python and OpenCV.  I've also read through most of both books and tried a majority of the examples - something that is really rare for me.  On that basis alone, I thought it deserved a review.

Am I 100% satisfied with the Premium bundle I got with no idea about how it could be improved upon?  If you read the 3 previous parts, you know that the answer is no.  I have some slightly idiosynchratic tastes and tend to be blunt (I usually prefer to say"honest") in my assessments.

If I were 30 years younger, I might seriously consider getting into computer programming as a career and learn as much as I could about Machine Learning, Computer Vision and other such topics.  As a starting point, I would recommend to my younger self to go through the material covered in Practical Python and OpenCV, read the many interesting posts on Adrian Rosebrock's blog, as well as the Python tutorials on the OpenCV site itself.  I would probably recommend to my younger self to get just the Case Studies bundle (not including the Ubuntu VirtualBox): my younger self would have been too stubborn/self-reliant to feel like asking questions to the author and would have liked to install things on his computer in his own way.

My old self still feels the same way sometimes ...

Tuesday, November 25, 2014

Practical Python and OpenCV: a review (part 3)

In part 1, I did a brief review of the "Practical Python and OpenCV" ebook which I will refer to as Book 1.  As part of the bundle I purchased, there was another ebook entitled "Case Studies" (hereafter referred to as Book 2) covering such topics as Face Detection, Web Cam Detection, Object Tracking in Videos, Eye Tracking, Handwriting Recognition, Plant Classification and Building an Amazon.com Cover Search.

Each topic in Book 2 is presented as part of a story with different characters (Jeremy, a student; Laura, a bank software programmer; etc.).   I have often read about how framing topics within a story is a good way to keep the interest of a reader.  However, personally I tend to prefer getting right down to the topic at hand (show me the executive summary! ...I gather from discussion that this is a trait shared by others that had a job like my previous one) and so, these stories do not really really appeal to me, but I do recognize their creativity and the work that went into creating them.

As a test of what I have learned to do while reading these books, I thought I should combine various topics of both books into a single experiment which constitutes the bulk of this post.  All the image processing (other than the screen captures) was done using OpenCV.

I decided to start with a photo, taken a few years ago with my daughter while visiting Montreal.
This photo was too large to fit entirely on my computer screen; as a test, I used a slightly modified version of the resize.py script included in Book 1 so that I could see it entirely on my computer screen, as shown below on the left.

 Then, I combined samples from a few scripts from Book 1 (load_display_save.py, drawing.py, cropy.py) together with ideas from this OpenCV tutorial covering mouse control and callbacks: The idea was to take the (resized) full image, show a rectangular selection (with a blue rectangle) and the corresponding cropped image on a separate window as shown below.


As the mouse moves, the selection changes.  The code to do so is listed below. Note that, when the selection is saved, the rectangular outline on the original image is changed to a green colour (not shown here) so as to give feedback that the operation was completed.


'''Displays an image and a cropped selection {WIDTH} x {HEIGHT} in a second
   window. Use ESC to quit the program; press "s" to save the image.

   Note: This program is only meant to be used from the command line and
   not as an imported module.
'''

import argparse
import cv2
import copy

WIDTH = 640
HEIGHT = 480
SELECT_COLOUR = (255, 0, 0)  # blue
SAVE_COLOUR = (0, 255, 0)    # green
_drawing = False
_x = _y = 0
_original = _cropped = None
default_ouput = "cropped.jpg"


def init():
    '''Initializes display windows, images and paths
       init() is meant to be used only with script invoked with
       command line arguments'''
    ap = argparse.ArgumentParser(
                    description=__doc__.format(WIDTH=WIDTH, HEIGHT=HEIGHT))
    ap.add_argument("-i", "--image", required=True,
                    help="Path to the original image")
    ap.add_argument("-o", "--output", default=default_ouput,
                    help="Path to saved image (default: %s)"%default_ouput)
    args = vars(ap.parse_args())

    original = cv2.imread(args["image"])
    cv2.namedWindow('Original image')
    cv2.imshow('Original image', original)

    cropped = original[0:HEIGHT, 0:WIDTH]  # [y, x] instead of the usual [x, y]
    cv2.namedWindow('Cropped')
    cv2.imshow("Cropped", cropped)
    return args, original, cropped


def update(x, y, colour=SELECT_COLOUR):
    '''Displays original image with coloured rectangle indicating cropping area
       and updates the displayed cropped image'''
    global _x, _y, _original, _cropped
    _x, _y = x, y
    _cropped = _original[y:y+HEIGHT, x:x+WIDTH]

    cv2.imshow("Cropped", _cropped)
    img = copy.copy(_original)
    cv2.rectangle(img, (x, y), (x+WIDTH, y+HEIGHT), colour, 3)
    cv2.imshow('Original image', img)


def show_cropped(event, x, y, flags, param):
    '''Mouse callback function - updates position of mouse and determines
       if image display should be updated.'''
    global _drawing

    if event == cv2.EVENT_LBUTTONDOWN:
        _drawing = True
    elif event == cv2.EVENT_LBUTTONUP:
        _drawing = False

    if _drawing:
        update(x, y)


def main():
    '''Entry point'''
    global _original, _cropped
    args, _original, _cropped = init()

    cv2.setMouseCallback('Original image', show_cropped)

    while True:
        key = cv2.waitKey(1) & 0xFF  # 0xFF is for 64 bit computer
        if key == 27:  # escape
            break
        elif key == ord("s"):
            cv2.imwrite(args["output"], _cropped)
            update(_x, _y, colour=SAVE_COLOUR)

    cv2.destroyAllWindows()

if __name__ == '__main__':
    main()

Using this script, I was able to select and save a cropped version of the original image.

With the cropped image in hand, I was ready to do some further experimentation including face and eye detection as well as blurring faces.  I decided to combine all these features into a single program listed below.  While the code provided with Book 2 worked perfectly fine for feature detection [using the appropriate version of OpenCV...] and gave me the original idea, I decided instead to adapt the code from the OpenCV face detection tutorial as I found it simpler to use as a starting point for my purpose.  I also used what I had learned from Book 1 about blurring.

The following code, was put together quickly and uses hard-coded paths. Since incorrect paths given to classifiers generate no mistakes/exceptions, I included some assert statements to insure that I was using the correct files for reasons that you can probably guess...

import cv2
import os
import copy

face_classifiers = 'cascades/haarcascade_frontalface_default.xml'
eye_classifiers = 'cascades/haarcascade_eye.xml'

cwd = os.getcwd() + '/'
assert os.path.isfile(cwd + face_classifiers)
assert os.path.isfile(cwd + eye_classifiers)

face_cascade = cv2.CascadeClassifier(face_classifiers)
eye_cascade = cv2.CascadeClassifier(eye_classifiers)

original = cv2.imread('images/cropped.jpg')
cv2.namedWindow('Image')
cv2.imshow('Image', original)

gray = cv2.cvtColor(original, cv2.COLOR_BGR2GRAY)
blue = (255, 0, 0)
green = (0, 255, 0)

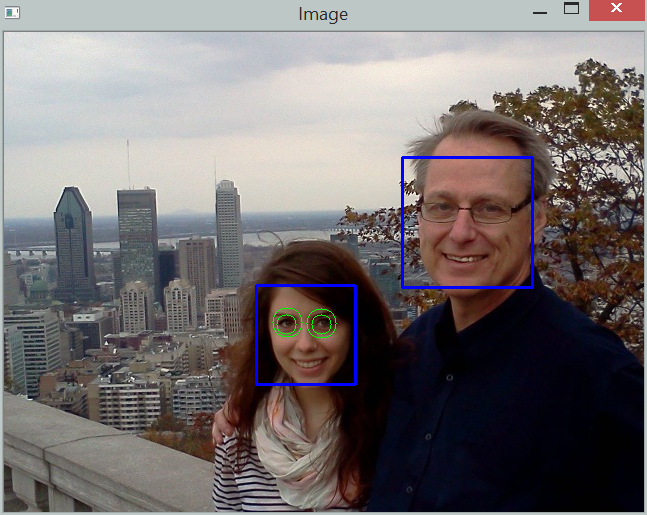
faces = face_cascade.detectMultiScale(gray, 1.3, 5)

def blur_faces(img):
    for (x, y, w, h) in faces:
        cropped = img[y:y+h, x:x+w]
        cropped = cv2.blur(cropped, (11, 11))
        img[y:y+h, x:x+w] = cropped
    cv2.imshow('Image', img)
def show_features(img, factor=1.1):
    for (x, y, w, h) in faces:
        cv2.rectangle(img, (x, y), (x+w, y+h), (255, 0, 0), 2)
        roi_gray = gray[y:y+h, x:x+w]
        roi_color = img[y:y+h, x:x+w]
        eyes = eye_cascade.detectMultiScale(roi_gray, scaleFactor=factor)
        for (ex, ey, ew, eh) in eyes:
            cv2.circle(roi_color, (ex+ew/2, ey+eh/2), (eh+eh)/4, (0, 255, 0), 1)
        cv2.imshow('Image', img)

while True:
    key = cv2.waitKey(1) & 0xFF  # 0xFF is for 64 bit computer
    if key == 27 or key == ord("q"):
        break
    elif key == ord("o"):
        cv2.imshow('Image', original)
    elif key == ord("f"):
        show_features(copy.copy(original))
    elif key == ord("b"):
        blur_faces(copy.copy(original))
    elif key == ord("5"):
        show_features(copy.copy(original), factor=1.5)

cv2.destroyAllWindows()

The results are shown below; first the original (reduced, cropped) image:

This is followed by the automated face and eye detection.  Note that the eye detection routine could not detect my eyes; my original thought was that this could be due to my glasses.  I did look for, and found some other training samples from the OpenCV sources ... but the few additional ones I tried did not succeed in detecting my eyes.  


The author mentioned in Book 2 that the "scaleFactor" parameter could be adjusted resulting sometimes in improved detection (or reduced false positives).  However, no matter what parameter I chose for the scale factor (or other possible parameters listed in Book 2), it did not detect my eyes ... but found that my daughter had apparently four eyes:


Finally, using a simple blur method adapted from Book 1, I could also blur the faces as shown below:


One important point to note though: I had initially downloaded and installed the latest version of OpenCV (3.0 Beta) and found that the face detection script included in Book 2 did not work -- nor (but for a different reason) did the one provided in the tutorial found on the OpenCV website.  So, in the end, and after corresponding with Adrian Rosebrock, the author of Books 1 and 2,   (who has been very patient in answering all my questions, always doing so with very little delay), I downloaded the previous stable version of OpenCV (2.49) and everything worked fine.

As an aside, while I found the experience of using a Virtual Box a bit frustrating, as mentioned in part 2 of this review, I must recognize that all the scripts provided worked within the Virtual Box.
However, the Virtual Box cannot capture the web camera.  Having OpenCV installed on my computer, I was able to run the scripts provided by the author together with my webcam ... and found that the face tracking using the web cam works very well; the eye tracking was a bit quirky (even without my glasses) until I realised that my eyes are rarely fully open: if I do open them wide, the eye tracking works essentially flawlessly.

Stay tuned for part 4, the conclusion.


Sunday, November 23, 2014

Practical Python and OpenCV: a review (part 2)

In part 1, I mentioned that I intended to review the "Case Studies" of the bundle I got from Practical Python and OpenCV  and that I would discuss using the included Ubuntu VirtualBox later.  However, after finishing the blog post on Part 1, I started looking at the "Case Studies" and encountered some "new" problems using the VirtualBox that I will mention near the end of this post.  So, I decided to forego using it altogether and install OpenCV directly.

Note: If you have experience using VirtualBoxes, then it might perhaps be useful to get the premium bundle that includes them; for me it was not.  Including a Ubuntu VirtualBox already set up with all the dependencies and the code samples from the two books is a very good idea and one  that may work very well for some people.

If you need to use VirtualBoxes on Windows for other reasons, perhaps you will find the following useful.

Setting up the VirtualBox

Running Windows 8.1, I encountered an error about vt-x not being enabled.   My OS is in French and googling French error messages is ... hopeless.  So, I used my best guess as to what were the relevant English pages.

From http://superuser.com/questions/785672/linux-64bit-on-virtual-box-with-window-7-profession-64-bit  I understood that I needed to access the BIOS to change the settings so that I could enable virtualization mode.

Unfortunately, I (no longer) was seeing an option to access the bios at boot time.     There are *many* messages about how to re-enable bios access at boot time, most of which simply did not work for me.  The simpler method I found to do so was following (at least initially) the explanation given at http://www.7tutorials.com/how-boot-uefi-bios-any-windows-81-tablet-or-device.

(However, I found out afterwards, that the bios not being accessible is possibly/likely simply because I had a fast startup option checked in power settings.)

Once I got access to the bios, I changed my settings to enable virtualization; there were two such settings ... I enabled them both, not knowing which one was relevant.  I do not recall exactly which settings (I've done this one month ago and did not take notes of that step)... but navigating through the options, it was very easy to identify them.

This made it possible to start the virtual box,  but when I tried for the first few times, I had to use the option to run as Administrator for this to work. 

The first time I tried to start the image (as an administrator), it got stuck at 20%.  I killed the process.  (I might have repeated this twice.)   Eventually, it started just fine and I got to the same stage as demonstrated in the demonstration video included with the bundle.   Started the terminal - the file structure is slightly different from what what is shown in the video but easy enough to figure out.

Using the VirtualBox

I've used the VirtualBox a few times since setting it up.  For some reason, it runs just fine as a normal user, without needing to use the option run as an Administrator anymore.  

My 50+ years old eyes not being as good as they once were, I found it easier to read the ebook on my regular computer while running the programs inside the VirtualBox.  Running the included programs, and doing some small modifications was easy to do and made me appreciate the possibility of using VirtualBoxes as a good way to either learn to use another OS or simply use a "package" already set up without having to worry about downloading and installing anything else. 

As I set up to start the "Case Studies" samples, I thought it would be a good opportunity to do my own examples.  And this is where I ran into another problem - which may very well be due to my lack of experience with Virtual Boxes.

I wanted to use my own images.  However, I did not manage to find a way to set things up so that I could see a folder on my own computer.  There is an option to take control of a USB device ... but, while activating the USB device on the VirtualBox was clearly deactivating it under Windows (and deactivating it was enabling it again on Windows indicating that something was done correctly), I simply was not able to figure out how to see any files on the usb key from the Ubuntu VirtualBox.  (Problem between keyboard and chair perhaps?)

I did find a workaround: starting Firefox on the Ubuntu VirtualBox, I logged in my Google account and got access to my Google Drive.  I used it to transfer one image, ran a quick program to modify it using OpenCV.  To save the resulting image (and/or modified script) onto my Windows computer, I would have had to copy the files to my Google Drive ...

However, as I thought of the experiments I wanted to do, I decided that this "back-and-forth" copying (and lack of my usual environment and editor) was not a very efficient nor very pleasant way to do things.

So, I gave up on using the VirtualBox, used Anaconda to install Python 2.7, Numpy, Matplotlib (and many other packages not required for OpenCV), installed OpenCV (3.0 Beta), ran a quick test using the first program included with Practical Python and OpenCV ... (loading, viewing and saving an image)  which just worked.

Take away

If you have some experience running VirtualBoxes successfully, including being able to copy easily files between the VirtualBox and your regular OS, then you are in a better position than I am to figure out if getting the premium bundle that includes a VirtualBox might be worth your while.

If you have no experience using and setting up VirtualBoxes, unless you wanted to use this opportunity to learn about them, my advice would be to not consider this option.

Now that I have all the required tools (OpenCV, Numpy, Matplotlib, ...) already installed on my computer, I look forward to spending some time exploring the various Case Studies.

---
My evaluation so far:  Getting the "Practical Python and OpenCV" ebook with code and image samples was definitely worth it for me.   Getting the Ubuntu VirtualBox and setting it up was ... a learning experience, but not one that I would recommend as being very useful for people with my own level of expertise or lack thereof.

My evaluation of the "Case Studies" will likely take a while to appear - after all, it took me a month between purchasing the Premium bundle and writing the first two blog post.  (Going through the first book could easily be done in one day.)  

I do intend to do some exploration with my own images and I plan to include them with my next review.

Practical Python and OpenCV: a review (part 1)

A few weeks ago, I purchased the premium bundle of Practical Python and OpenCV consisting of a pdf book (Practical Python and OpenCV) and short Python programs explained in the book, a Case Studies bundle also consisting of a pdf book and Python programs, and a Ubuntu VirtualBox virtual machine with all the computer vision and image processing libraries pre-installed.

In this post, I will give my first impression going through the Practical Python and OpenCV part of the bundle.  My intention at this point is to cover the Case Studies part in a future post, and conclude with a review of the Ubuntu VirtualBox, including some annoying Windows specific problems I encountered when I attempted to install use it and, more importantly, the solutions to these problems. (In short: my Windows 8 laptop came with BIOS setttings that prevented such VirtualBoxes from working - something that may be quite common.)

The Practical Python and OpenCV pdf book (hereafter designated simply by "this book") consists of 12 chapters.  Chapter 1 is a brief introduction motivating the reader to learn more about computer vision.  Chapter 2 explains how to install NumPy, SciPy, MatplotLib, OpenCV and Mahotas.  Since I used the virtual Ubuntu machine, I skipped that part.  If I had to install these (which I may in the future), I would probably install the Anaconda Python distribution (which I have used on another computer before) as it already include the first three packages mentioned above in addition to many other useful Python packages not included in the standard distribution.

Chapter 3 is a short chapter that explains how to load, display and save images using OpenCV and friends.  After reading the first 3 chapters, which numerically represent one quarter of the book, I was far from impressed by the amount of useful material covered.  This view was reinforced by the fourth chapter (Image Basics, explaining what a pixel is, how to access and manipulate pixels and the RGB color notation) and by the fifth chapter explaining how to draw simple shapes (lines, rectangles and circles).  However, and this is important to point out, Chapter 5 ends at page 36 ... which is only one-quarter of the book.  In my experience, most books produced "professionally" tend to have chapters of similar length (except for the introduction) so that one gets a subconscious impression of the amount of material covered in an entire book by reading a few chapters.  By contrast here, the author seems to have focused on defining a chapter as a set of closely related topics, with little regards to the amount of material (number of pages) included in a given chapter.  After reading the entire book, this decision makes a lot of sense to me here - even though it initially gave me a negative impression (Is that all there is? Am I wasting my time?) as I was reading the first few chapters.  So, if you purchased this book as well, and stopped reading before going through Chapter 6, I encourage you to resume your reading...

Chapter 6, Image Processing, is the first substantial chapter.  It covers topics such as Image transformations (translation, rotation, resizing, flipping, cropping), image arithmetic, bitwise operation, masking, splitting and mergin channels and conclude with a short section on color spaces which I would probably have put in an appendix.  As everywhere else in the book, each topic is illustrated by a simple program.

Chapter 7 introduces color histograms explaining what they are, and how to manipulate them to change the appearance of an image.

Chapter 8, Smoothing and Blurring, explains four simple methods (simple averaging, gaussian, median and bilateral) used to perform smoothing and blurring of images.

Chapter 9 Thresholding, covers three methods (simple, adaptive, and Otsu and Riddler-Calvard) to do thresholding.  What is thresholding?... it is a way to separate pixels into two categories (think black or white) in a given image.  This can be used as a preliminary to identify individual objects in an image and focus on them.

Chapter 10 deals with Gradients and Edge Detection.  Two methods are introduced (Laplacian and Sobel, and Canny Edge Detector).  This is a prelude to Chapter 11 which uses these techniques to count the number of objects in an image.

Chapter 12 is a short conclusion.

After going (quickly) through the book, I found that every individual topic was well illustrated by at least one simple example (program) showing the original image and the expected output.  Since the source code and images used are included with the book, it was really easy to reproduce the examples and do further exploration either using the same images or using my own images.   Note that I have not (yet) tried all the examples but all those I tried ran exactly as expected and are explained in sufficient details that they are very straightforward to modify for further exploration.

For the advanced topic, you will not find some theoretical derivation (read: math) for the various techniques: this is a book designed for people having at least some basic knowledge of Python and who want to write programs to do image manipulation; it is not aimed at researchers or graduate students in computer vision.

At first glance, one may think that asking $22 for a short (143 pages) ebook with code samples and images is a bit on the high side as compared with other programming ebooks and taking into account how much free material is already available on Internet. For example, I have not read (yet) any of the available tutorials on the OpenCV site  ... However, I found that the very good organization of the material in the book, the smooth progression of topics introduced and the number of useful pointers (e.g. Numpy gives nb columns X nb of rows unlike the traditional rows X cols in linear algebra; OpenCV store images in order Blue Green Red, as opposed to the traditional Red Green Blue, etc.) makes it very worthwhile for anyone that would like to learn about image processing using OpenCV.
I should also point out that books on advanced topics (such as computer vision) tend to be much pricier than the average programming book.  So the asking price seems more than fair to me.

If you are interested in learning about image processing using OpenCV (and Python, of course!), I would tentatively recommend this book.  I wrote tentatively as I have not yet read the Case Studies book: it could well turn out that my recommendation would be to purchase both as a bundle.  So, stay tuned if you are interested in this topic.

Wednesday, November 19, 2014

Translating a programming environment

tl;dr: volunteers always welcome! ;-)

Over the past few years, there has been an explosion in the number of web sites dedicated to teaching programming.  A few, like Codecademy, are making an effort to offer multilingual content.  While there seems to exist a prejudice shared by many programmers that "real programmers code in English and therefore everyone should learn to program using English", there is no doubt that for most non-English speakers, having to learn programming concepts and new English vocabulary at the same time can make the learning experience more challenging. So, for beginners, the best learning environment is one that is available in their native tongue.  However, to do so can require a massive amount of work and a team of people.  Freely available programming environments rely on the help of volunteers to provide translation.

Viewed from the outside, the work required to translate a programming environment like that of codecademy appears to be an all or nothing kind of effort, as everything (UI, lessons and feedback messages) is tightly integrated.  A given tutorial is broken up in a series of lessons, each of which can be translated independently.  For many of these lessons, the range of acceptable input by users is fairly limited, and so are the possible feedback messages.  Still, the amount of work required for providing a complete translation of a given tutorial is enormous.

When I started the work required to create Reeborg's World, I knew that I would be largely on my own.  Still, I wanted to make sure that the final "product" would be available in both English and French, and could be adapted relatively easily for other languages.  The approach I have used for Reeborg's World is different than that of codecademy, and has been greatly influenced by my past experiences with RUR-PLE and Crunchy, as well as during the development of Reeborg's World itself.

1. I have completed separated the tutorials from the programming environment itself.  Thus, one can find a (slightly outdated) tutorial for complete beginners in English as well as  a French version of the same tutorial, separately from the programming environment itself.  This separation of the tutorial and the programming environment makes it easily possible for others to create their own tutorial (in whatever language) like this beautiful tutorial site created by a teacher in California that makes use of Reeborg's World, but calls the robot Karel as a hat tip to the original one created by Richard Pattis.

2. The programming environment is a single web page, with a mimimum amount of visible text. Currently, there are two versions: one in English, and one in French.

3. Programming languages available are standard ones (currently Python, Javascript and CoffeeScript). Whereas I have seen translated "real" programming language (like ChinesePython or Perunis, both of which are Python with keywords and builtins translated in other languages) or translated mini-programming language, like that used by Guido van Robot, I do not believe that the slight additional work required to memorize the meaning of keywords and builtins is a significant hurdle, especially when taking into account the possibilities of using the programming language outside of the somewhat artificial learning environment.

4. Possible feedback given to the user are currently available in both French and English.  The approach I have used is to create a simple Javascript function

RUR.translate = function (s) {
    if (RUR.translation[s] !== undefined) {
        return RUR.translation[s];
    } else {
        return s;
    }
};

Here, RUR is a namespace that contains the vast majority of functions and other objects hidden from the end user.   A given html page (English or French) will load the corresponding javascript file containing some translations, such as

RUR.translation["Python Code"] = "Code Python";

The total number of such strings that need to be translated is currently slightly less than 100.

5. Functions (and a class) specific to Reeborg's World are available in both English and French, as well as in Spanish (for the Python version).  By default, the English functions are loaded on the English page and the French ones are loaded on the French page.  An example of a definition of a Python command in English could be:

move = RUR._move_

class UsedRobot(object):
    def move(self):
        RUR.control.move(self.body)

whereas the French equivalent would be

avance = RUR._move_

class RobotUsage(object):
    def avance(self):
        RUR.control.move(self.body)

with similar definitions done for Javascript.

6. When using Python, one can use commands in any human language by using a simple import statement.  For example, one can use the French version of the commands on the English page as follows:

from reeborg_fr import *
avance()     #   equivalent to move()
move()       #   still works by default

If anyone is interested in contributing, this would likely be the most important part (and relatively easy, as shown above) to translate in other languages.

7. As part of the programming environment, a help button can be clicked so that a window shows the available commands (e.g. move, turn_left, etc.).  When importing a set of commands using Python in a given human language as above, there is also a provision to automatically update the help available on that page based on the content of the command file. (While the basic commands are available in Spanish, the corresponding help content has not been translated yet.)

8. In order to teach the concept of using a library, two editor tabs are available on the page of the programming environment, one of which represents the library.  In the tutorial I wrote, I encourage beginners to put the functions that they define and reuse in many programs, such as turn_right or turn_around, in their library so that they don't have to redefine them every single time.  The idea of having a user library is one that was requested in the past by teachers using RUR-PLE.  The idea of using a second editor on the second page is one that I first saw on this html canvas tutorial by Bill Mill.  When programming in Javascript (or CoffeeScript), for which the concept of a library is not native like it is in Python, if the user calls the function

import_lib();

the content of the library will be evaluated at that point.

For Python, I ensure that the traditional way works.   Brython (which I use as the Python in the browser implementation) can import Python files found on the server.  For the English version, the library is called my_lib.py and contains the following single line:

from reeborg_en import *

(The french version is called biblio.py and contains a similar statement.)

When a user runs their Python program, the following code is executed

def translate_python(src):
    import my_lib
    #setup code to save the current state of my_lib

    exec(library.getValue(), my_lib.__dict__)
    exec("from reeborg_en import *\n" + src)

    # cleanup to start from a clean slate next time

The content of the editor (user program) is passed as the string src.  
library.getValue()returns the content of the user library as a string.  Even if my_lib only imported once by Brython, its content effectively gets updated each time a program is run by a user.

9. One thing which I did not translate, but that we had done for Crunchy (!), are the Python traceback statements.  However, they are typically simplified from the usual full tracebacks provided.

In summary, to provide a complete translation of Reeborg's World itself in a different language, the following are needed:
1. a translated single page html file;
2. a javascript file containing approximately 100 strings used for messages;
3. a Python file containing the defintion of the robot functions as well as a corresponding "help" section;
4. a javascript file containing the definition of the robot functions. If the Python file containing translation is available, it is trivial for me to create this corresponding javascript file.

Saturday, November 08, 2014

Tracking users

A while ago, after reading about how much excessive tracking of users is done on the web, I decided that I was not going to track users of Reeborg's World.  I had initially tracked users with piwik, found that some minor spikes occurred when I posted about it (I even found out that one person had copied the entire site) but the information that I got did not seem to be worth getting.

So, I stopped tracking, and mentioned on the site and elsewhere that I was not tracking users ... and have no idea how much it is used (it's free to use and does not require any login), and if the various changes I made to the site which are intended to be improvements are seen as such by the silent users.

A few people have contacted me with suggestions for improvements and with mentions of how useful the tutorial and the programming environment were in helping to learn Python.  I am very grateful to those that contacted me.  Still, I am curious about how much the site is used.

So, I am going to start tracking users and thought I should mention it in the interest of openness.  After reading about various options, I am thinking of using Clicky instead of Piwik ... but I am curious to find out if anyone has better suggestions.

Thursday, November 06, 2014

Line highlighting working - development version

Reeborg's World is better than RUR-PLE ever was in all aspects ... except for one thing: line of codes being executed were simultaneously highlighted in RUR-PLE something which, up until now, had not been possible to do on the web version as it relied upon some features specific to CPython.

Well... I may have just found an alternative method. :-)


Tuesday, November 04, 2014

Partial fun

My daughter suggested to me that

To sort in descending order in python, you should be able to do
detros() instead of sorted( ... reverse = True)

This is what I suggested to her:

>>> from functools import partial
>>> detros = partial(sorted, reverse=True)
>>> detros([1, 3, 4, 2])
[4, 3, 2, 1]

I love Python. :-)

Sunday, November 02, 2014

Tasks with random initial values

Quick Reeborg update:

Reeborg's World now allows for tasks with randomly selected initial values within a certain range.  For example, this world (and solution) is such that Reeborg can start at any of three initial positions, in any of the four basic orientations.   Furthermore, there is an initially unspecified number of tokens at grid position (5, 4).    This type of random selection opens the possibility to create more interesting programming challenges.