Each topic in Book 2 is presented as part of a story with different characters (Jeremy, a student; Laura, a bank software programmer; etc.). I have often read about how framing topics within a story is a good way to keep the interest of a reader. However, personally I tend to prefer getting right down to the topic at hand (show me the executive summary! ...I gather from discussion that this is a trait shared by others that had a job like my previous one) and so, these stories do not really really appeal to me, but I do recognize their creativity and the work that went into creating them.
As a test of what I have learned to do while reading these books, I thought I should combine various topics of both books into a single experiment which constitutes the bulk of this post. All the image processing (other than the screen captures) was done using OpenCV.
I decided to start with a photo, taken a few years ago with my daughter while visiting Montreal.
This photo was too large to fit entirely on my computer screen; as a test, I used a slightly modified version of the resize.py script included in Book 1 so that I could see it entirely on my computer screen, as shown below on the left.
Then, I combined samples from a few scripts from Book 1 (load_display_save.py, drawing.py, cropy.py) together with ideas from this OpenCV tutorial covering mouse control and callbacks: The idea was to take the (resized) full image, show a rectangular selection (with a blue rectangle) and the corresponding cropped image on a separate window as shown below.

As the mouse moves, the selection changes. The code to do so is listed below. Note that, when the selection is saved, the rectangular outline on the original image is changed to a green colour (not shown here) so as to give feedback that the operation was completed.
'''Displays an image and a cropped selection {WIDTH} x {HEIGHT} in a second
   window. Use ESC to quit the program; press "s" to save the image.

   Note: This program is only meant to be used from the command line and
   not as an imported module.
'''

import argparse
import cv2
import copy

WIDTH = 640
HEIGHT = 480
SELECT_COLOUR = (255, 0, 0)  # blue
SAVE_COLOUR = (0, 255, 0)    # green
_drawing = False
_x = _y = 0
_original = _cropped = None
default_ouput = "cropped.jpg"


def init():
    '''Initializes display windows, images and paths
       init() is meant to be used only with script invoked with
       command line arguments'''
    ap = argparse.ArgumentParser(
                    description=__doc__.format(WIDTH=WIDTH, HEIGHT=HEIGHT))
    ap.add_argument("-i", "--image", required=True,
                    help="Path to the original image")
    ap.add_argument("-o", "--output", default=default_ouput,
                    help="Path to saved image (default: %s)"%default_ouput)
    args = vars(ap.parse_args())

    original = cv2.imread(args["image"])
    cv2.namedWindow('Original image')
    cv2.imshow('Original image', original)

    cropped = original[0:HEIGHT, 0:WIDTH]  # [y, x] instead of the usual [x, y]
    cv2.namedWindow('Cropped')
    cv2.imshow("Cropped", cropped)
    return args, original, cropped


def update(x, y, colour=SELECT_COLOUR):
    '''Displays original image with coloured rectangle indicating cropping area
       and updates the displayed cropped image'''
    global _x, _y, _original, _cropped
    _x, _y = x, y
    _cropped = _original[y:y+HEIGHT, x:x+WIDTH]

    cv2.imshow("Cropped", _cropped)
    img = copy.copy(_original)
    cv2.rectangle(img, (x, y), (x+WIDTH, y+HEIGHT), colour, 3)
    cv2.imshow('Original image', img)


def show_cropped(event, x, y, flags, param):
    '''Mouse callback function - updates position of mouse and determines
       if image display should be updated.'''
    global _drawing

    if event == cv2.EVENT_LBUTTONDOWN:
        _drawing = True
    elif event == cv2.EVENT_LBUTTONUP:
        _drawing = False

    if _drawing:
        update(x, y)


def main():
    '''Entry point'''
    global _original, _cropped
    args, _original, _cropped = init()

    cv2.setMouseCallback('Original image', show_cropped)

    while True:
        key = cv2.waitKey(1) & 0xFF  # 0xFF is for 64 bit computer
        if key == 27:  # escape
            break
        elif key == ord("s"):
            cv2.imwrite(args["output"], _cropped)
            update(_x, _y, colour=SAVE_COLOUR)

    cv2.destroyAllWindows()

if __name__ == '__main__':
    main()
Using this script, I was able to select and save a cropped version of the original image.
With the cropped image in hand, I was ready to do some further experimentation including face and eye detection as well as blurring faces. I decided to combine all these features into a single program listed below. While the code provided with Book 2 worked perfectly fine for feature detection [using the appropriate version of OpenCV...] and gave me the original idea, I decided instead to adapt the code from the OpenCV face detection tutorial as I found it simpler to use as a starting point for my purpose. I also used what I had learned from Book 1 about blurring.
The following code, was put together quickly and uses hard-coded paths. Since incorrect paths given to classifiers generate no mistakes/exceptions, I included some assert statements to insure that I was using the correct files for reasons that you can probably guess...
import cv2
import os
import copy

face_classifiers = 'cascades/haarcascade_frontalface_default.xml'
eye_classifiers = 'cascades/haarcascade_eye.xml'

cwd = os.getcwd() + '/'
assert os.path.isfile(cwd + face_classifiers)
assert os.path.isfile(cwd + eye_classifiers)

face_cascade = cv2.CascadeClassifier(face_classifiers)
eye_cascade = cv2.CascadeClassifier(eye_classifiers)

original = cv2.imread('images/cropped.jpg')
cv2.namedWindow('Image')
cv2.imshow('Image', original)

gray = cv2.cvtColor(original, cv2.COLOR_BGR2GRAY)
blue = (255, 0, 0)
green = (0, 255, 0)

faces = face_cascade.detectMultiScale(gray, 1.3, 5)

def blur_faces(img):
    for (x, y, w, h) in faces:
        cropped = img[y:y+h, x:x+w]
        cropped = cv2.blur(cropped, (11, 11))
        img[y:y+h, x:x+w] = cropped
    cv2.imshow('Image', img)
def show_features(img, factor=1.1):
    for (x, y, w, h) in faces:
        cv2.rectangle(img, (x, y), (x+w, y+h), (255, 0, 0), 2)
        roi_gray = gray[y:y+h, x:x+w]
        roi_color = img[y:y+h, x:x+w]
        eyes = eye_cascade.detectMultiScale(roi_gray, scaleFactor=factor)
        for (ex, ey, ew, eh) in eyes:
            cv2.circle(roi_color, (ex+ew/2, ey+eh/2), (eh+eh)/4, (0, 255, 0), 1)
        cv2.imshow('Image', img)

while True:
    key = cv2.waitKey(1) & 0xFF  # 0xFF is for 64 bit computer
    if key == 27 or key == ord("q"):
        break
    elif key == ord("o"):
        cv2.imshow('Image', original)
    elif key == ord("f"):
        show_features(copy.copy(original))
    elif key == ord("b"):
        blur_faces(copy.copy(original))
    elif key == ord("5"):
        show_features(copy.copy(original), factor=1.5)

cv2.destroyAllWindows()
The results are shown below; first the original (reduced, cropped) image:

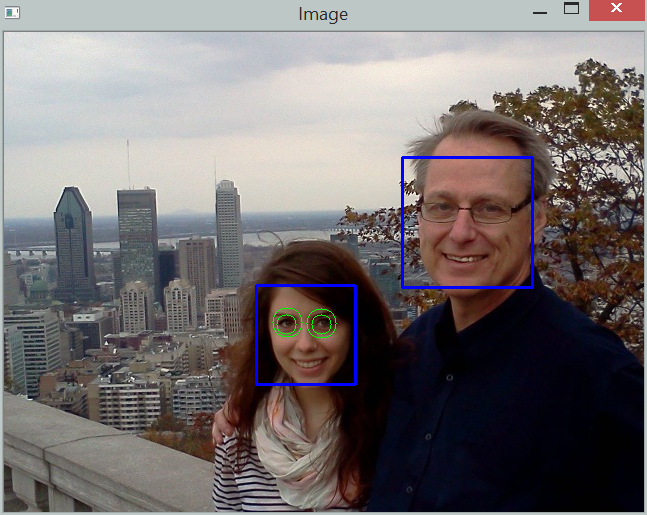
This is followed by the automated face and eye detection. Note that the eye detection routine could not detect my eyes; my original thought was that this could be due to my glasses. I did look for, and found some other training samples from the OpenCV sources ... but the few additional ones I tried did not succeed in detecting my eyes.

The author mentioned in Book 2 that the "scaleFactor" parameter could be adjusted resulting sometimes in improved detection (or reduced false positives). However, no matter what parameter I chose for the scale factor (or other possible parameters listed in Book 2), it did not detect my eyes ... but found that my daughter had apparently four eyes:
Finally, using a simple blur method adapted from Book 1, I could also blur the faces as shown below:

One important point to note though: I had initially downloaded and installed the latest version of OpenCV (3.0 Beta) and found that the face detection script included in Book 2 did not work -- nor (but for a different reason) did the one provided in the tutorial found on the OpenCV website. So, in the end, and after corresponding with Adrian Rosebrock, the author of Books 1 and 2, (who has been very patient in answering all my questions, always doing so with very little delay), I downloaded the previous stable version of OpenCV (2.49) and everything worked fine.
As an aside, while I found the experience of using a Virtual Box a bit frustrating, as mentioned in part 2 of this review, I must recognize that all the scripts provided worked within the Virtual Box.
However, the Virtual Box cannot capture the web camera. Having OpenCV installed on my computer, I was able to run the scripts provided by the author together with my webcam ... and found that the face tracking using the web cam works very well; the eye tracking was a bit quirky (even without my glasses) until I realised that my eyes are rarely fully open: if I do open them wide, the eye tracking works essentially flawlessly.
Stay tuned for part 4, the conclusion.
No comments:
Post a Comment